


Magazine Archive
Home -> Magazines -> Issues -> Articles in this issue -> View
DIY Fret Work | |
Setting Up Your GuitarArticle from Sound On Stage, February 1997 | |
While not everybody wants to be a guitar tech, there are many aspects of setting up a guitar that you can do for yourself, as Paul White explains.

If the octaves are sharp, adjust the bridge saddles slightly further away from the neck: if the octaves are flat, then adjust the saddles closer to the neck.
The performance of a good guitar can be completely ruined by a bad setup job, and many brand new guitars play a lot worse than they should. If you buy a quality instrument from a respectable music shop, their guitar tech should check it over first — it is still surprising how many new guitars are delivered badly set up. If you have an instrument with serious problems, such as a twisted neck or badly worn frets, a pro guitar tech is the best way to get it sorted, but most aspects of basic setting up are well within reach of the user. All you need are a few basic tools and a little patience. If you feel your guitar isn't at its best, read on.
For the purpose of this piece, I'm assuming you have a Strat or one of the similarly styled, non-Fender guitars, but most of what I'm going to say is applicable to all electric guitars.
STRING-FELLOWS
Next time you change your strings, take off the old strings and give the neck and body a good cleaning. You can buy fancy guitar creams and polishes that smell wonderfully of lemon oil, but domestic furniture polish has always worked for me. Leave the spray on the fingerboard for a minute or two before cleaning as this will help loosen all the grime that invariably builds up next to the frets. Check for unduly worn frets. If any have been giving you problems, I'd recommend you get a guitar tech to reprofile the frets for you. I do my own with an oilstone if the wear isn't too great, but unless you know what you're doing, it's easy to make things worse.
Most electric guitar players seem to go for 9 to 42 gauge strings, although you may have your own preference. When fitting the strings, pull them through the holes in the bridge (or tailpiece) as far as you can before threading the other end through the hole in the appropriate tuning peg. Views differ as to whether or not you should wrap the string over itself so as to lock it. If you leave enough slack to take up just a couple of turns around the peg when the guitar is tuned, I think you'll find the strings hold firmly enough without. My own preference is also to make a right-angled bend at the end of the string where it leaves the peg — it also seems to help avoid slipping.

For the Strat, Fender recommend that the distance between the bottom of any open string and the 17th fret is set to around 1/16 of an inch.
A mistake many inexperienced players make is to wrap too many turns around the peg when fitting their strings. This often causes tuning problems as the wrapped string tends to shift on the peg after tuning up or during playing. Finally, cut off any excess string, leaving just an inch or two — it's all too easy to stab yourself in the eye with a long string end! — but don't cut the strings before fitting them as the winding may start to come loose. If you tend to play with a lot of tremolo and do heavy string bending, you might find that fitting a set of locking machine heads provides you with more stable tuning. It's also a lot less cumbersome than using locking nut and bridge hardware.
INTONATIONAL
If your guitar is perfectly set up, just tune up and play. If you haven't checked your intonation recently, or if you've changed to a different make or gauge of string, it's probably as well to get out your tuner and try the following checks.
Tune the guitar up to pitch. If you have a tremolo fitted, you'll probably have to work around the strings several times before they settle down. This is because every time you tighten one string, the tremolo springs stretch and all the other strings slacken slightly. After tuning up, play the octave of each string in turn on the 12th fret and make sure that when checked on your tuner these read the same as for the open strings. If the octaves are sharp, adjust the bridge saddles slightly further away from the neck: if the octaves are flat, then adjust the saddles closer to the neck. After each adjustment, re-tune the string in question and check again.
One area that seems to concern many players is the action — the height of the strings above the frets. Some players demand the lowest action that nature will allow. Personally I don't favour ludicrously low actions, because it makes the strings harder to bend without your fingers skidding over the top, and fret buzz will almost certainly occur when you play hard. Even if you can't hear the fret buzz through your amp, you'll still lose sustain. Most modern guitars have adjustable height on the individual bridge saddles, although some (such as the Gibson Tunomatic bridge) still use bridges supported on two posts where the only adjustment is the post height.
For the Strat, Fender recommend that the distance between the bottom of any open string and the 17th fret is set to around 1/16 of an inch. My own preference is to set it rather higher. I also tend to set the bottom string action a fraction higher than the top string. When you've set up an action that doesn't buzz, yet is low enough to be comfortable, check that notes don't 'choke' when you bend strings, especially on the higher frets. If they do, you'll probably need to raise the action a little more.

If pick-ups are set too far fom the strings, the sound output level will be reduced; if they are set too close, their magnets can interfere with the natural vibration of the string.
NECK ACHE
How well you can set up your action depends on the straightness of the guitar neck and on the way the nut slots are cut. Taking the neck first, this should have a slightly concave profile. If it is dead straight, you'll get fret buzz because a vibrating string moves more in the centre than at the ends. Again referring to Fender's recommendations, you should check the curvature of your neck by fitting a capo to the first fret, and then, while holding down the 6th string on the last fret, measure the gap between the string and the top of the 8th fret. This should be around 10 thousandths of an inch, or roughly the thickness of a postcard. Car feeler gauges are the best way to measure this accurately.
If the distance is significantly greater than that recommended, your neck may be too curved. In order to straighten it, you'll need to tighten the truss rod slightly. On the other hand, if the neck is too straight, slacken the truss rod very slightly to allow the neck to relax under the tension from the strings.
The truss rod is a metal bar, which runs inside the neck, and is kept under tension to counteract the bending force of the strings. Depending on the guitar, it may be tightened by either a nut or a screw slot located either on the tailstock (usually beneath a plastic plate), or at the far end of the neck where it joins the body. Occasionally you'll come across a guitar, which uses a different system, such as Rickenbacker's dual truss rod. If in doubt, seek advice before adjusting.
On a conventional guitar, adjusting the truss rod isn't a particularly difficult job. It is best, however, to make small adjustments, then wait a few minutes to allow the neck to settle. Then you can check the results of your handiwork by re-tuning the guitar and re-measuring the neck curvature. Usually, an eighth of a turn at a time is quite enough.
A minor adjustment to the truss rod can make a significant difference to the action, so check your bridge saddle heights each time after adjusting the truss rod. Don't adjust the truss rod, if you haven't got problems with your action — don't make adjustments just to see what happens!

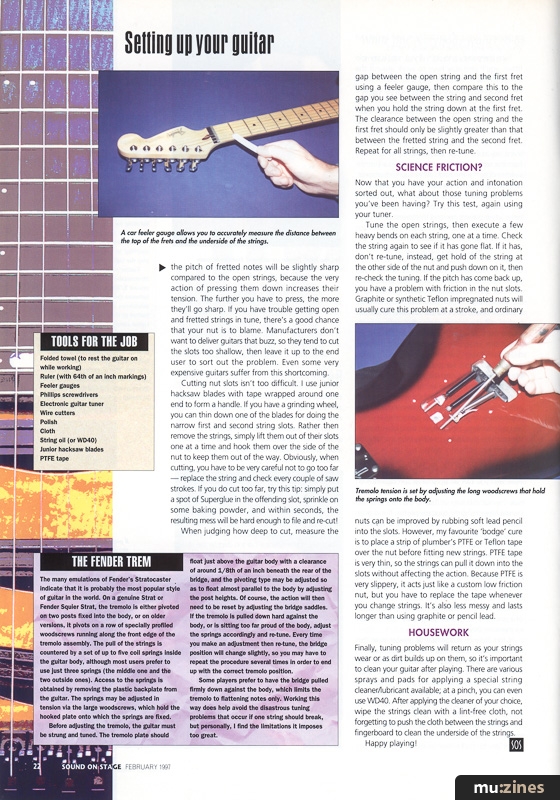
A car feeler gauge allows you to accurately measure the distance between the top of the frets and the underside of the strings.
NUTS!
One of my pet hobby horses is that guitar nuts are often cut insufficiently, which not only makes the action feel harder, it also causes tuning problems. Obviously, if the slots are cut too deeply, the strings will buzz on the first fret, but if they are too shallow, the pitch of fretted notes will be slightly sharp compared to the open strings, because the very action of pressing them down increases their tension. The further you have to press, the more they'll go sharp. If you have trouble getting open and fretted strings in tune, there's a good chance that your nut is to blame. Manufacturers don't want to deliver guitars that buzz, so they tend to cut the slots too shallow, then leave it up to the end user to sort out the problem. Even some very expensive guitars suffer from this shortcoming.
Cutting nut slots isn't too difficult. I use junior hacksaw blades with tape wrapped around one end to form a handle. If you have a grinding wheel, you can thin down one of the blades for doing the narrow first and second string slots. Rather then remove the strings, simply lift them out of their slots one at a time and hook them over the side of the nut to keep them out of the way. Obviously, when cutting, you have to be very careful not to go too far — replace the string and check every couple of saw strokes. If you do cut too far, try this tip: simply put a spot of Superglue in the offending slot, sprinkle on some baking powder, and within seconds, the resulting mess will be hard enough to file and re-cut!

Tremolo tension is set by adjusting the long woodscrews that hold the springs onto the body.
When judging how deep to cut, measure the gap between the open string and the first fret using a feeler gauge, then compare this to the gap you see between the string and second fret when you hold the string down at the first fret. The clearance between the open string and the first fret should only be slightly greater than that between the fretted string and the second fret. Repeat for all strings, then re-tune.
SCIENCE FRICTION?
Now that you have your action and intonation sorted out, what about those tuning problems you've been having? Try this test, again using your tuner.
Tune the open strings, then execute a few heavy bends on each string, one at a time. Check the string again to see if it has gone flat. If it has, don't re-tune, instead, get hold of the string at the other side of the nut and push down on it, then re-check the tuning. If the pitch has come back up, you have a problem with friction in the nut slots. Graphite or synthetic Teflon impregnated nuts will usually cure this problem at a stroke, and ordinary nuts can be improved by rubbing soft lead pencil into the slots. However, my favourite 'bodge' cure is to place a strip of plumber's PTFE or Teflon tape over the nut before fitting new strings. PTFE tape is very thin, so the strings can pull it down into the slots without affecting the action. Because PTFE is very slippery, it acts just like a custom low friction nut, but you have to replace the tape whenever you change strings. It's also less messy and lasts longer than using graphite or pencil lead.
HOUSEWORK
Finally, tuning problems will return as your strings wear or as dirt builds up on them, so it's important to clean your guitar after playing. There are various sprays and pads for applying a special string cleaner/lubricant available; at a pinch, you can even use WD40. After applying the cleaner of your choice, wipe the strings clean with a lint-free cloth, not forgetting to push the cloth between the strings and fingerboard to clean the underside of the strings^
Happy playing!
PICK-UPS
Fender's recommendation for the Stratocaster is to ensure you have around 3/32nds of clearance between the strings and pick-up polepieces when the strings are fretted at their highest positions. Listen carefully to the levels of the different strings. If you find the level isn't even, lower the end of the pick-up beneath the loudest string and try again. Repeat this for all pick-ups. This procedure is valid for all guitars, although the optimum pick-up spacing may vary slightly from model to model.
TOOLS FOR THE JOB
- Ruler (with 64th of an inch markings)
- Feeler gauges
- Phillips screwdrivers
- Electronic guitar tuner
- Wire cutters
- Polish
- Cloth
- String oil (or WD40)
- Junior hacksaw blades
- PTFE tape
THE FENDER TREM
Before adjusting the tremolo, the guitar must be strung and tuned. The tremolo plate should float just above the guitar body with a clearance of around 1/Sth of an inch beneath the rear of the bridge, and the pivoting type may be adjusted so as to float almost parallel to the body by adjusting the post heights. Of course, the action will then need to be reset by adjusting the bridge saddles. If the tremolo is pulled down hard against the body, or is sitting too far proud of the body, adjust the springs accordingly and re-tune. Every time you make an adjustment then re-tune, the bridge position will change slightly, so you may have to repeat the procedure several times in order to end up with the correct tremolo position.
Some players prefer to have the bridge pulled firmly down against the body, which limits the tremolo to flattening notes only. Working this way does help avoid the disastrous tuning problems that occur if one string should break, but personally, I find the limitations it imposes too great.
More with this topic
 The Value Of The Valve (Part 1) |
 Fix It! - How To Repair Your Damaged Drums |
 Resistance is Useless! - Impedance & Resistance Explained |
 Workbench - Signal Processors — the saga continues |
 Eliminating Patch Cords Without Eliminating Capability - A Practical Approach |
 Adding an Independent Tracking Output to the 4780 Sequencer |
 Care & Repair - Tape Machine Line-Up |
 Set It Up! |
 Fret Work - Could You Be A Guitar Tech? |
 Guitar Survival |
 Studio Sound Techniques (Part 1) |
 First Guitar Faults - Your First Guitar |
Browse by Topic:
Maintenance / Repair / Modification
Publisher: Sound On Stage - SOS Publications Ltd.
The contents of this magazine are re-published here with the kind permission of SOS Publications Ltd.
The current copyright owner/s of this content may differ from the originally published copyright notice.
More details on copyright ownership...

Sound On Stage - Feb 1997
Feature by Paul White
Help Support The Things You Love
mu:zines is the result of thousands of hours of effort, and will require many thousands more going forward to reach our goals of getting all this content online.
If you value this resource, you can support this project - it really helps!
Donations for June 2026
Issues donated this month: 0
New issues that have been donated or scanned for us this month.
Funds donated this month: £0.00
All donations and support are gratefully appreciated - thank you.
Magazines Needed - Can You Help?
Do you have any of these magazine issues?
If so, and you can donate, lend or scan them to help complete our archive, please get in touch via the Contribute page - thanks!